Point cabbage pizza salad

The secret to get that really fresh and vibrant feeling of your pizza salad is to use real vinegar in it and oregano. Apart from that, the other ingredients can be altered. This time we used point cabbage instead of white cabbage and also added some raw bell pepper in to add some extra fibers and vitamins.

IMG_5235
Homemade pizza salad in a bowl.

Pizza salad

Ingredients used:

  • 1 cabbage head
  • 1 Tbsp 24% vinegar
  • 1 Tbsp water
  • 2 Tbsp mild olive oil
  • Dried oregano
  • Salt & pepper
IMG_5228
Ingredients for pizza salad.

How to:

  1. Mix the vinegar, water and olive oil with the seasoning in a bowl.
  2. Shave the cabbage finely and chop the bell pepper. Add to the bowl with vinegar.
  3. Toss well and leave for a while, preferably over night.


We had the pizza salad for lunch with a “spinach cake”. It was supposed to be a frittata but we had ran out of eggs apparently, having only two left. But that worked as well, by whipping the eggs with some water before covering the spinach and than topped it with a lot of grated pecorino.

IMG_5238
“Spinach cake” with eggs and pecorino.

It is very convenient to use frozen, chopped spinach since it really is fast food and can easily be kept in the freezer at all times. Very handy. Just de-frost it in the frying pan before adding the eggs.

IMG_5245
A simple paleo lunch.

Avocado and some leftover chicken was served to the pizza sallad and spinach cake as well.

Happy cooking,

Cecilia & Magnus

Curry chicken w. leek and cabbage wedges

This dinner we made whole chicken in the Schlemmertopf.


IMG_4982
Chicken with leek cooked in the Schlemmertopf.


We started off with a nice mix of spices:

  • turmeric
  • curry
  • ginger
  • cayenne peppper
  • cumin
  • black pepper and
  • fennel.

Together with that we cut a leek into three pieces and chopped a red chili, which we spread out on top of the chicken.

IMG_4970
Chicken with a nice assortment of spices.


IMG_4972
The red chili pepper, which we got in our delivery from Årstiderna.

I have found that it makes for a better dish seasoning wise to decide on the amount of spices before one puts them in the pan or stew, etc. Putting them straight into the food I tend to be a bit restrictive, whereas if I place them on a plate or in the mortar and then pour them into the food I tend to be closer to the sweet spot. The past few times I have done this way I have ended up with close to perfect amount of the spices I selected. There is still a long way to go for me to get the whole composition between the tastes right, but in terms of using the spices to bring out the flavours of the food this seems to be working for me at least.

IMG_4975
The spices going into the Schlemmertopf together with the chicken.


After pre-soaking the Schlemmertopf, mortaring the spices in need of that and chopping the chili it all was placed in the pot and put into the oven at 140 °C.

IMG_4978
The final chicken.

As sides we made white cabbage wedges that we roasted in the oven after taking out the chicken, that we left to rest in the Schlemmertopf.

IMG_4984
The dinner plate, chicken leg, leek, white cabbage wedges and fresh grated carrots and beets.

Finally we served the chicken and the cabbage wedges with a few leaves of lettuce and some freshly grated carrots and red beets.

Happy paleo,

Cecilia & Magnus

Fritata and salad topped w. Pecorino cheese

It wasn’t too long ago that we made fritata (as we were informed is the proper name, rather than omelette), but after getting a new delivery from Årstiderna with Pecorino cheese and olive oil it was time again anyways.

IMG_4964
Fritata w. tomatoes topped with Pecorino cheese.

We made a really simple one this time. Just the eggs, water and grate cheese, mix it and pour it into the cast iron pan and then placed thin slices of tomato on top. To get the fritata well done without burning it we use to cover the pan with a lid.

IMG_4956
The simple ingredients for the fritata. Eggs, tomatoes, pepper and cheese for topping. The eggs were of course mixed with some water before ending up in the pan.

For the last few minutes we put the grated cheese on top of the fritata and returned it to the stove with the lid on.

IMG_4961
The final, good-looking result.

We had also go a fresh delivery of vegetables and avocado from Årstiderna this same day, so we enjoyed the fritata with fresh vegetables. Both the bell pepper, cucumber and the tomatoes were some of the freshest vegetables I have ever tasted, even compared to the farmers’ market vegetables that we got during our year in Dublin. The vegetables were amazingly crispy and so filled with flavours. It is definitely not the last time we buy vegetables from Årstiderna simply because of that reason. It was obvious that they had not stored the vegetables for a week in a distribution center before sending them us. They were maybe not freshly harvested, but close enough. Not even our groceries from FRAM are as fresh as these.

IMG_4966
A perfect simple dinner plate. Fresh salad with pecorino topped fritata.

I also want to take the opportunity to brag a bit about the fritata, it was by far the best one I have ever accomplished. Perfect texture all throughout without being burnt or getting stuck in the bottom of the pan. Wonder if that will ever happen again…

Happy cooking,

Cecilia & Magnus

Roasted red cabbage wedges

Cabbage, red or white, is almost always available in our kitchen. It’s so versatile and for this dinner we made wedges and roasted them in the oven with garlic, lemon and pecorino cheese on top!

IMG_4947
Oven roasted red cabbage for dinner.

Red cabbage w. pecorino cheese

  • One head of cabbage
  • A few garlic cloves
  • One lemon, juice and zest
  • Coconut oil, melted
  • Pecorino cheese
IMG_4941
Pretty red cabbage wedges.
  1. Heat the oven to 200°C.
  2. Cut the cabbage head in wedges and place in an oven ramekin.
  3. Mince the garlic cloves and zest the lemon. Rub it into the wedges. Slice the lemon and squeeze the juice on top as well.
  4. Pour some liquid coconut oil on top, add salt and pepper and place in the oven for about 40 minutes.
  5. Grate the cheese and spread on top of the wedges, put back in the oven for another 10 minutes.
IMG_4944
Oven roasted red cabbage with grated cheese.

The cabbage was served with some leftover meat patties and a piece of cow’s heart, saurkraut and green olives. Top with a click of butter and some olive oil before eating!

IMG_4951
A nice paleo dinner.

Happy cabbage cooking,

Cecilia & Magnus

Eggplant & gammon

As mentioned, we did bunker a lot of gammon after Christmas. Because of that, some creativity is needed in order to not get fed up by it. This innovative dish with eggplant and tomato sauce in a cast iron ramekin turned out really nice. Find the recipe below.

IMG_4888
Dinner served in cast iron ramekins.

In order to reduce any possible bitterness of the eggplant, slice them and sprinkle salt over. Let the salt drag out liquid for about 10 minutes and dry them with a paper towel. We don’t always do that and usually the eggplant is fine anyway, but this time I thought it was convenient to make the slices a bit softer as well so that they could be fitted into the ramekins.

IMG_4879
First, salt the eggplant slices.

Ham and eggplant in tomato sauce

Ingredients used:

  • Pre-cooked gammon
  • Eggplant in slices
  • Crushed, canned tomatoes
  • Dijon mustard
  • Fresh garlic
  • Dried basil
  • Goat cheese

How to:

IMG_4882
Ingredients used in the dish.
  1. Place the sliced eggplant in suitable oven ramekin and bake in the oven at 225°C for about 15 minutes, until soft and slightly browned.
  2. Mix the canned tomatoes with dijon mustard, pressed garlic, basil, salt and pepper. Dice the ham in small cubes.
  3. Put the ham in the eggplant and cover with the tomato sauce.
  4. Top with some goat cheese.
  5. Finish off in the oven at 225°C for another 15 minutes until the goat cheese is golden.
IMG_4889
Eggplant and gammon in tomato sauce topped with goat cheese and some greens.

Serve with some greens and a nice glass of red wine if you like.

The cast iron ramekins not only keep the food warm throughout the dinner, they seems to add a lot of iron to the food as well based on the iron taste that the food gets. Very nice!

Happy cooking,

Cecilia & Magnus

Pulled pork w. sweet mini peppers

With our new portion-sized cast iron ramekins we have had the possibility to explore some new ways of presenting as well as cooking our food. Nothing too surprising or ground-breaking (yet) but well some additional inspiration.

The last week we bought some pork loin which we thought would be nice to make pulled pork with. We have done it before, but every time one revisits a dish some new factor is added. One gets a different feel for which spices should be included. The ratio meat to sauce changes somewhat or one alters the oven temperature and time slightly. So, it is always interesting to see how the new dish turns out.

IMG_4911
Pulled pork with oven roasted carrot and parsnip sticks served with feta cheese filled sweet mini peppers.

This time we used tomato sauce and garlic as the base together with the loin of pork. The spices were black pepper, cummin, ginger, cinnamon and cayenne pepper. The whole thing was mixed into the Schlemmertopf and cooked in the oven for almost four hours. Unfortunately on a slightly low temperature for the meat to really fall apart, but the taste could not have been better!

IMG_4897
The ingredients for the pulled pork.

As a side for the pulled pork we made sticks of carrots and parsnips that we roasted in the oven along-side with sweet mini peppers that we stuffed with matured feta cheese.

IMG_4903
The sweet mini peppers and the matured feta cheese. With the carrots and parsnips in the background.

Since we figured that the carrots and parsnips needed to be in the oven longer than the peppers and on a higher temperature than the pulled pork we took out the Schlemmertopf with the pulled pork and let it rest whilst the vegetables we roasted on the higher temperature. With 15 minutes left before serving we put the peppers in as well. The peppers were placed in our new portion-sized ramekins which as a really nice way of serving them in the end, since they kept the heat nicely when serving.

IMG_4918
The final dinner, enjoyed with a glass of red wine.

Whilst waiting for the vegetables to finish in the oven we pulled the pork apart. And then we put it all together and enjoyed a really nice dinner with a glass of red wine to go with the food. The spicing of the pulled pork turned out really, really well. The cinnamon and ginger together with almost too much cayenne pepper made a perfect combination.

/Cecilia & Magnus

North African lamb stew

Another lamb stew packed with spices and flavour! Can’t get enough of it and it is so convenient to just let it slowcook in the Wonderbag. To add some extra color and nutrients to the tomato-red stock and the orange root vegetable mash we had steamed red cabbage served with it.

IMG_4819
North African lamb stew for dinner!

We found some really nice pieces of lamb neck and lamb leg at the butcher, perfect meat for this stew.

Spicy lamb stew

Ingredients used:

  • Lamb meat on the bone, 1-2 kg
  • 400 g crushed tomatoes
  • Brown onion
  • Garlic
  • Fresh ginger
  • Bone broth + water
  • Coriander seeds
  • Cumin seeds
  • Ground sweet paprika
  • Ground turmeric
  • Cloves
  • Cardamom seeds
  • Cinnamon
  • Salt & pepper
IMG_4803
Ingredients that will melt together in the Wonderbag.

How to:

1. First, dry-roast the coriander and cumin seeds in a pan.

2. Mortar together with the turmeric, paprika, salt and pepper.

3. Toss the lamb meat in the spices.

IMG_4809
Mortar the yummy spices.
IMG_4813
Cover the lamb meat in the spices before frying.

4. Heat a pot with lard, coconut oil or butter and brown the meat.

5. Place the meat aside, chop the onion and brown it until soft in the pan. When soft, add chopped garlic and grated ginger.

6. Place the meat back in the pan and add the crushed tomato, bone broth and water to cover all the pieces.

7. Add the cloves, cardamom and cinnamon.

8. Let the stew boil softly for at least 30 minutes and place in the Wonderbag for a minimum of 4 hours.

The stew is of course possible to leave on the stove top to finish as well, but a slowcooker is better!

IMG_4818
Lamb stew served with a glass of red wine.

All the spices creates a well needed cosiness and warmth during these cold winter months. To balance the dish, it’s nice to squeeze some lemon juice on top before eating!

Happy slowcook,

Cecilia & Magnus

Loin of pork w. garlic and cayenne

Last time at the butcher we bough a number of pork loins, really nice marbled as always! It can be a bit messy to fry them in a cast iron pan like we usually do, but to cook them in the oven like this is really convenient!

IMG_4361
Loin of pork for dinner.

The pork loin was served with the Hasselback squash from the day before and the red cabbage salad as well as some sauerkraut. Don’t forget the click of butter on top as well!

IMG_4353
Loin of pork with garlic cloves and cayenne pepper.

It’s very simple. Just put the meat in a oven ramekin and season with salt, pepper and cayenne pepper. Add some whole garlic cloves on top as well!

Place in the oven at 150°C and cook until the meat isn’t red anymore. In the oven, it’s a small risk for the meat to become dry some the timing is not crucial.

IMG_4355
Loin of pork after being cooked in the oven.

How delicious doesn’t these loin of pork look? So juicy and so much flavor! Not only from the seasoning but also from the meat itself since it is from free-range happy pigs.

IMG_4359
Dinnertime. Loin of pork, butternut squash, red cabbage and sauerkraut.

An organic red wine from Algarve, Portugal was enjoyed to the dinner.

Happy cooking,

Cecilia & Magnus

Hasselback beetroots recipe

An old classic from my (Magnus) childhood was the hasselback potatoe. It was a definitive Saturday dinner favourite for sure. After going paleo I have however completely forgot about it and it has actually not been something that I have missed, but the other day I got the idea of doing a hasselback variation on beetroots.

IMG_4154
Hasselback beetroots seasoned and ready for the oven.

The great thing with the hasselback concept is that the small cuts in the top are roasted and creates a nice crispiness that is otherwise hard to achieve unless one cuts really thin slices and cooks them like chips… An other nice feature is that the cuts also increase the effective surface of the vegetable which in turn means that there are more opportunity to expose the vegetable for spices or butter(!) to really get out as much taste as possible.

IMG_4148
Beetroots and garlic.

Start by turning on the oven at 210 °C, then cut the beetroots in half. Next up is doing the hasselback cuts.

After having done some hasselback potatoes in my days I have come across a nice and simple way of efficiently making the cuts.

  1. Pick a tree tool with a thin flat handle from the kitchen drawer (or wherever you have store your kitchen tools).
  2. Place the the beetroot alongside the flat tree handle.
  3. Use a sharp knife to cut down through the beetroot to the tree handle. Make sure to keep the knife level with the cutting board so that you don’t cut through the beetroot the whole way.

The tree handle is then helping to avoid cutting through the whole beetroot and creates a nice and even depth of the cuts.

IMG_4150
Using a flat tree tool handle as a support for the cutting.

Next, when all the beetroots are cut place them in a ramekin. This time we added some chopped garlic as well. Then season richly with salt and pepper and top with a click of butter on each beet root half. Place the ramekin in the hot oven for roughly 45 minutes.

IMG_4158
The finished hasselback beetroots.

To go with the beetroots we made some minced meat patties with fried onion and mushrooms together with a small green salad.

IMG_4161
Dinner with hasselback beetroots and meet patties.

Do you have any old time favourites that might inspire your cooking? Please let us know!

Happy paleo,

Cecilia & Magnus

Carb counting and insulin index

As mentioned, during October I’ve been counting all my carbs and tried to translate that into how many grams of carbs each unit of insulin can handle for me. Time to use some math skills!

0e5776b560b4164617aa01a7bf85ddae.jpg

Carb counting

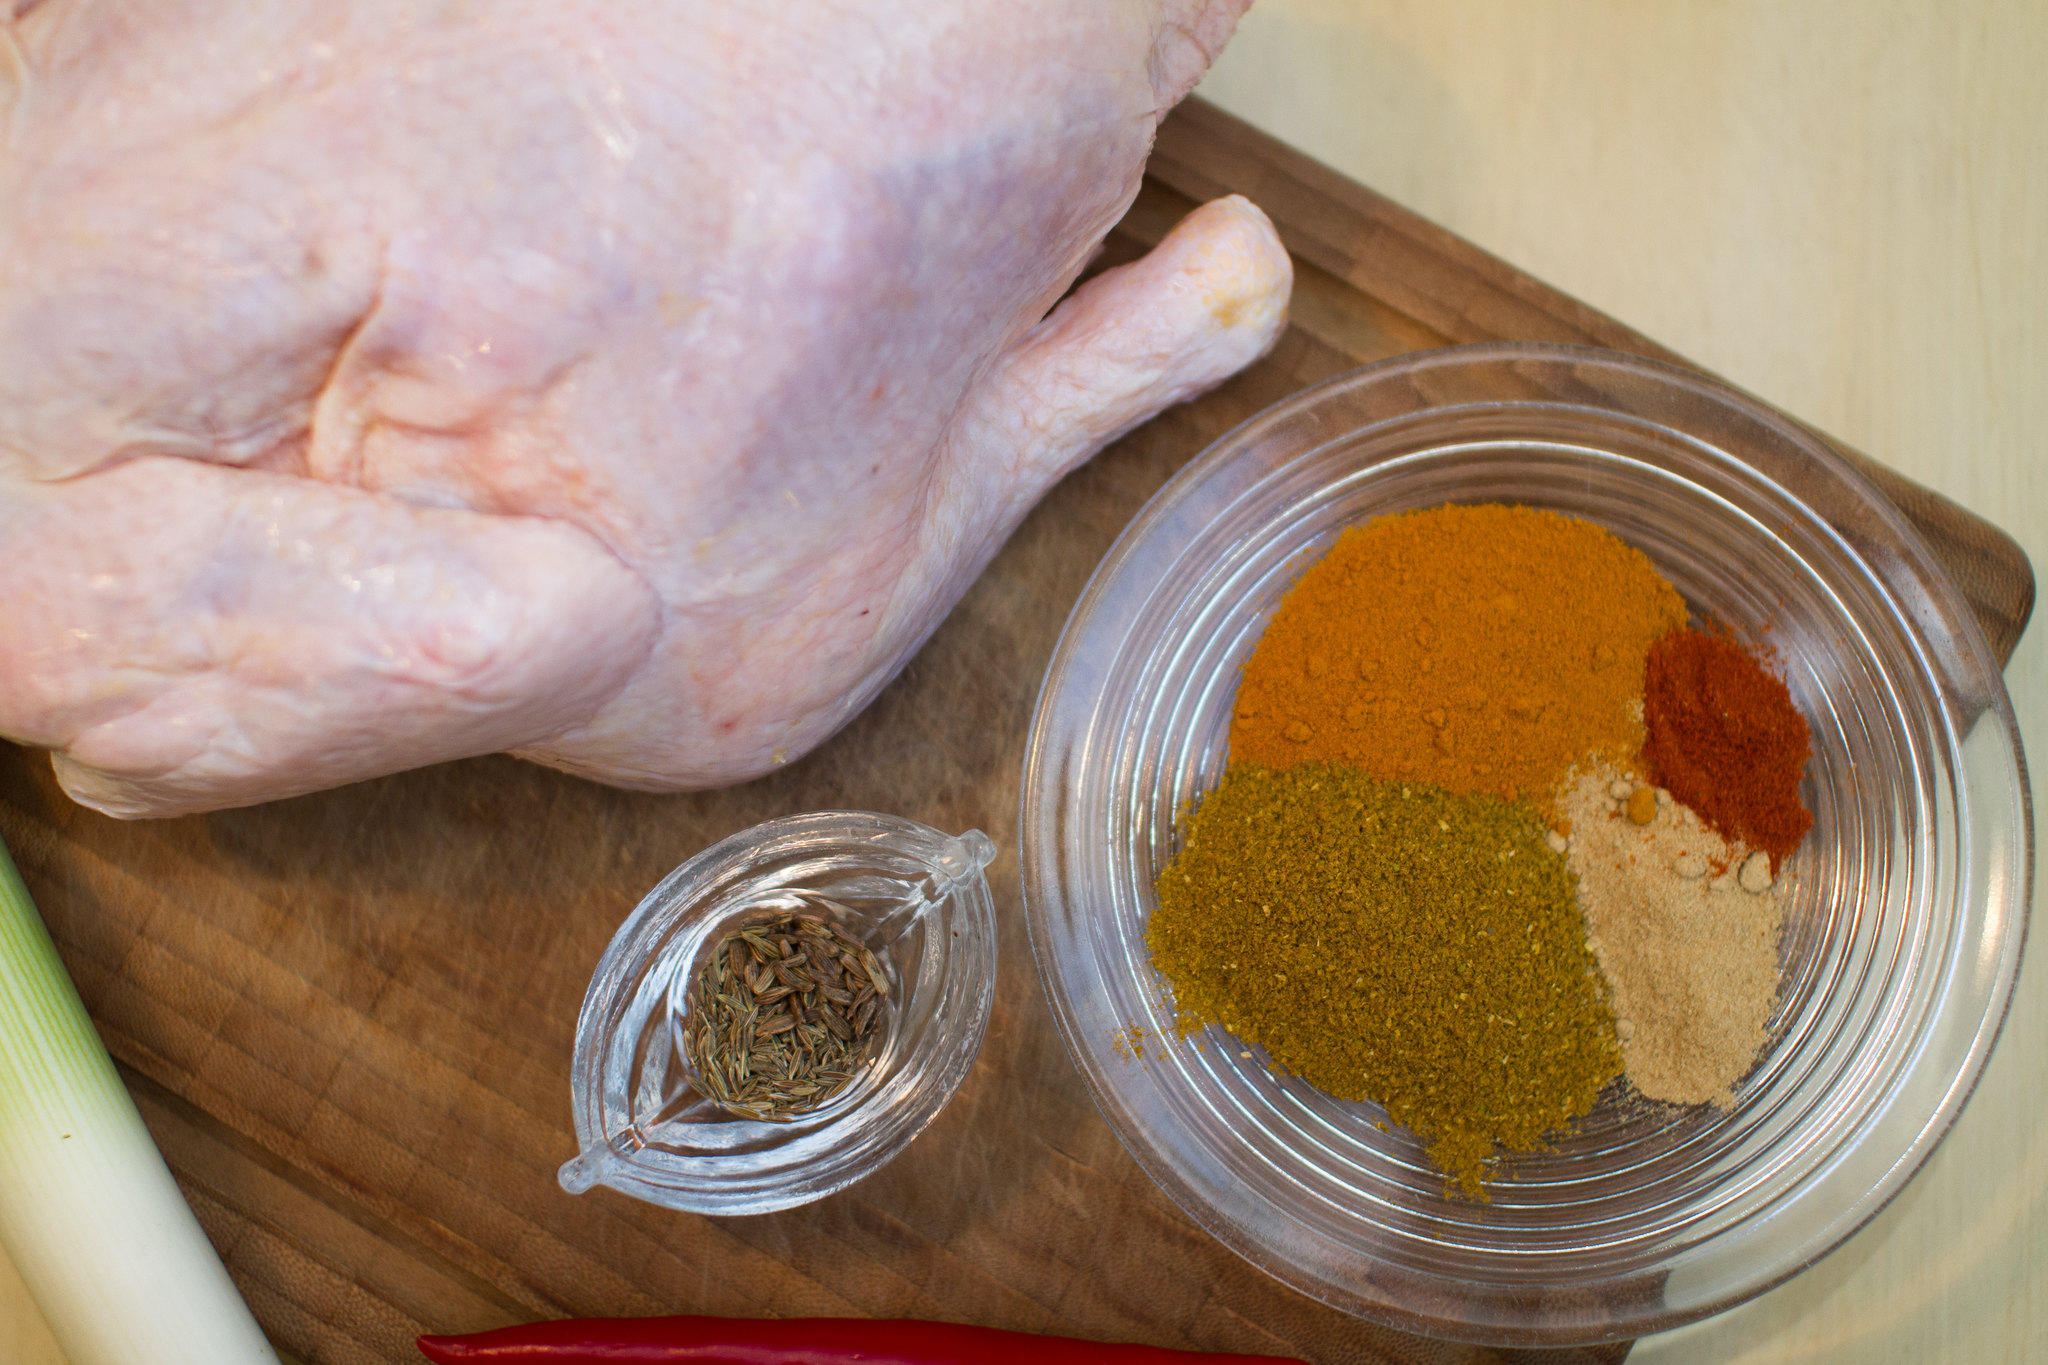
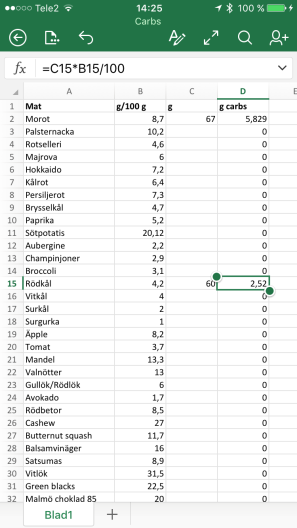
In my phone I have an excel sheet with a list of food and corresponding carbohydrates per 100 grams. In column B the carbohydrate content for each food is entered and in column C I enter the total number of grams I put on my plate (measured with help of a kitchen scale). Then I get the total amount of carbs on the plate in column D and summed up to a grand total in the end. This is the easiest way I have come up with, a quick and simple carb calculator. I’m sure there is a lot of similar ones out there, for free or to buy, but why not make one yourself! It’s especially convenient to be able to enter your home cooked food in the list as well, for example the butternut squash soup.
image1

Insulin index

So how is the amount of carbs translated into a correct dose of insulin? With help of a table like this:
ii

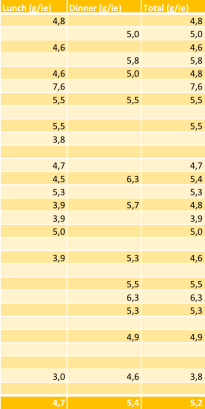
Where the numbers in each cell is calculated from another excel sheet where I enter blood glucose level before a meal and two hours past that meal as well as the grams of carbs for each meal and the dose insulin I have taken. It looks like this in each cell, one row for every day:

=IF(ABS(BGbeforemeal-BGaftermeal)<=2; gcarbs/ieinsulin; “”)

So basically what it says is that if the difference in blood glucose before and two hours after a meal don’t differ more than 2 mmol/L, then it should calculate how many grams of carbs I have eaten to each unit of insulin. Otherwise it should just give null as an answer since I’m not interested in that suboptimal outcome. I do this for lunch and dinner!

In the Total column is the average per day, expressed as:

=AVERAGE(Table[@[Lunch (g/ie)]:[Dinner (g/ie)]])

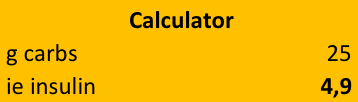
and in the end (shown as 5,2 in the yellow table above) the average of all the valid values are calculated, which is meant to give me the answer grams of carbohydrates per each unit insulin:

=AVERAGE.IF([Total (g/ie)];”>=0″;[Total (g/ie)])

That result is then used in my Calculator where I just enter the amount of carbs I’m going to eat and it gives me an answer of how much insulin I need to take by:

=[Total (g/ie)]/Table[[#Sums];[Total (g/ie)]]

cc

Do you follow? Some skills in excel are needed, but the math is very simple!

Unfortunately, as you can see in the yellow table, it’s not always the truth! It’s seldom the truth actually and the numbers also varies a lot between the days. The body is not a machine that runs on the same terms all the time and that is one of the things that makes diabetes type 1 a nightmare to live with. But this calculator can at least be used as a qualified guess instead of just a guess.

I’m also thinking about adding the amount of protein I eat into this calculation as well to see if it gives a better qualified guess…

/Cecilia